Night Photography of the Full Moon over the City of Providence
There is no denying that after the sun sets the city of Providence comes to life, in a dazzling display of lights and colors. I love going into the city for photography of the many beautiful buildings as they are illuminated by all of these colors. Nighttime photography is one of my favorites, and the city of Providence at night provides an endless array of subjects to photograph.
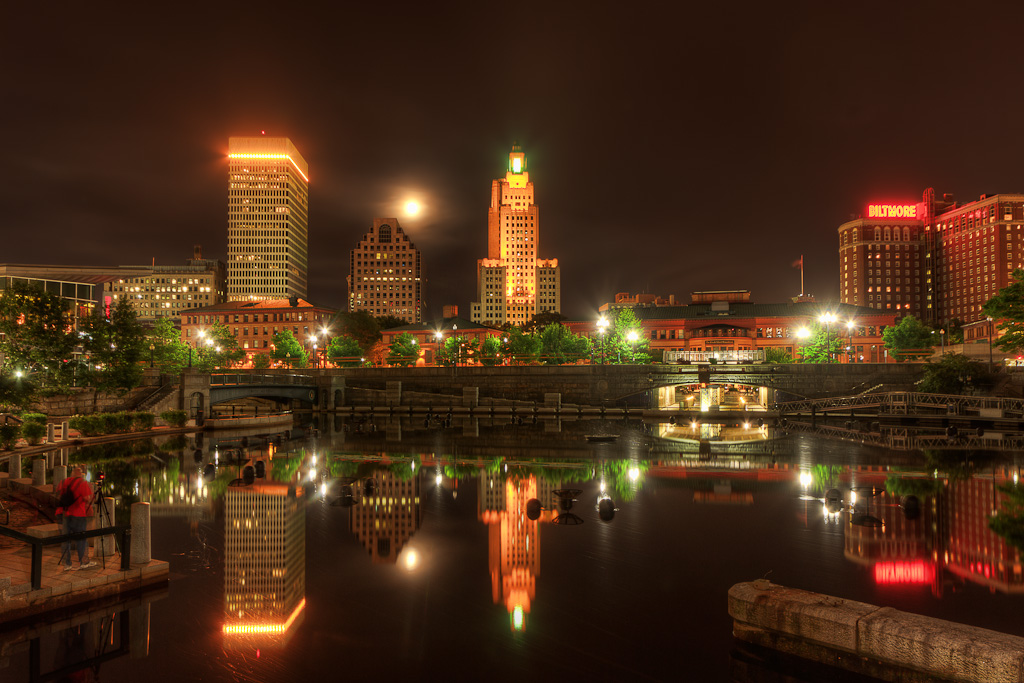
Full Moon Over Provience – Waterplace Park Providence Rhode Island
On this night there was a full moon, and I ventured out with the intent of making a photograph of the full moon rising over the city. I met up with another photographer and we began exploring downtown, starting at the State House while the sun was setting. It was July 3rd, and many of the surrounding cities were doing their fireworks that night so the city itself was virtually empty.
As the sun set and the sky grew dark, we moved down into Waterplace Park and watched as the moon began to glow in the sky. I composed a photograph that put the rising moon between the Bank of America Building and One Financial Plaza. I was careful to include the full reflection of the skyline in the parks water, and felt that including the bright red neon signs of the Biltmore Hotel on the right of the photograph added a sense of balance.
As an interesting note, the Bank of America Building – the building in the center of the photograph – is known throughout Rhode Island as “The Superman Building”, due to the similarities to the building used in the original Superman movie. It is also the tallest building in Providence at 428 feet tall.
For photography at night 2 pieces of equipment are really critical – a tripod, and a remote camera release. Night time photographs are often many seconds to several minutes or longer and a tripod is really the only way to hold the camera still enough to get a sharp photograph. The cable release allows you to snap the shutter to take a photograph without touching the camera, helping to keep the camera as still as possible to help get these sharp images.
With my camera securely positioned, and the scene composed the way I liked, it was time to figure out the camera settings. I was using a wide angle lens at 16mm to fit the scene in, and I new that at an aperture of f/8.0 I would have enough Depth of Field to have everything in the photograph in focus. I set my ISO as low as possible to minimize noise, which is 100 for my camera. My meter indicated that 10 seconds would create a proper exposure, so I fired off a shot and checked both the Histogram and the “blinkies” (officially called Highlight Warning, this feature causes any highlight that are blown out to blink on the LCD display).
I was not surprised to see that the Histogram showed that I had areas of both complete black, and pure white. Using the information that the histogram gave me, I decided HDR would help bring out some of the details in the park in front of me, as well as help to control some of the extreme highlights in the buildings. I fired off additional frames at -1, -2, and -3 EV, as well as +1 and +2 EV. It is not uncommon to have more exposures on the minus side then on the plus side, and every scene is going to be a little different. I use the histogram and the blinkies to tell me when I am no longer clipping any of the highlights, and I simply keep lowering my exposure one stop at a time until I am content with what I see.
Once I get my photographs onto the computer, my workflow is pretty straightforward. I start in Lightroom and apply some basic adjustments to the RAW files. This includes selecting a Camera Profile, making any Lens Corrections, and setting the White Balance to what I want. I apply these settings to all of the photographs in the bracketed set, and then export the files to Photomatix.
I don’t use any presets in Photomatix, I opt to treat each image differently. I tend to start at the top slider and move it to the left and right and pick a spot that creates the photograph that I have in mind. I do this for most of the sliders, and then save the file and import it back to Lightroom. I will then edit the image in Photoshop to clean up the image before exporting the image to the web for sharing.
I hope that you enjoy my nighttime photography of the city of Providence, and as always feedback is welcomed!